
Wednesday, 11 May 2016
Evaluation Question 3: What have you learned from your audience feedback?

When I first began my research and planning I produced a case study of a stereotypical audience member for Frank Hamilton.
Whilst constructing my music video, CD Digipak and Music magazine advertisement I made sure that I look back at my target audience to make sure that what I was making would appeal to them as this is the most important thing.
I would make sure that I ask people that are in Frank Hamilton's target audience what they think of what it is we have done. As Frank Hamilton's audience their feedback is very important.
Music Video
Throughout the process of constructing the music video I have conducted audience research. Whilst writing and publishing the research and planning posts such as props, costume and casting planning. I also made sure to have people watch my animatic to get audience feedback so I can use this to help me alter it to make it better.
The reason why I tried to get this audience feedback was to ensure that the progress being made was appealing to Frank Hamilton's target audience so that I was not ruining his image and making sure I represented him well.
All of the feedback that I got was very positive therefore I proceeded with the production of the music video. If my target audience is happy then that is the most important thing. I created an animatic which I had several people of Frank Hamilton's target audience look at and they all agreed that the story line is good and represents Frank Hamilton well as this is his sort of style.
CD Digipak
After coming up with the idea for my music video I decided to create some designs for my CD Digipack's front cover. I knew that I wanted to follow the conventions of a CD Digipak which I found out from all of the research that I had previously done for this. Here are the three designs that I quickly sketched and showed to the target audience:


After showing these designs to members of the target audience I found out that the first design was the most popular straight away. This is very helpful because I then went on to choose to use this design as the final product. All three of the designs are very simple however even the positioning of the artist, artist name and album name are so important that I thought it would be a good idea to ask my target audience for their thoughts.
As I knew that the target audience liked the first design this is the one I went for and here is the finished product based on this design:

Music Magazine Advertisement
Due to my music magazine advertisement linking in very nicely with the CD Digipak with the same imagery and text I did not do as much in depth audience feedback for it. Doing the audience feedback for the CD Digipak in depth was important as I found out that they like the style. I then proceeded to use the same design for the music magazine advertisement and this is good because if you look at them you can instantly tell that they are both linked meaning better advertisement.
Here they are next to each other to show you how nicely they link together:

I did not do any in depth audience feedback for the music magazine advertisement but throughout I made sure to keep showing people who are in Frank Hamilton's target audience and they gave me a lot of positive feedback therefore I continued on with the construction.
Overall, receiving feedback from the target audience about how my music video "Summer", the CD digipak and music magazine advertisement look was extremely helpful and educational because it gave me insight into what Frank Hamilton's target audience want to see. I used all of the feedback to make cohesive, creative and appealing products for the target audience.
Monday, 9 May 2016
Sunday, 8 May 2016
Saturday, 7 May 2016

Friday, 6 May 2016

Thursday, 5 May 2016
Evidence of Music Video Production: Frank Hamilton - "Summer"
Firstly I imported all of the clips that I recorded whilst out filming
for the first time. I didn't have a lot of clips therefore I thought
that maybe I would need to film some more later in the process.


Next I put all of my clips onto the timeline and also the audio so I had
an idea of how much time my raw footage would take up before the edit
and also make it easier for me to edit.

I moved all clips to the right to give myself some space to begin the
edit. I started to cut the clips following along with my animatic that I
had previously made however it didn't look as good as expected so I
stopped following the animatic but still followed the original
storyline.

As you can see in this screenshot I was running out of footage very fast
and we definitely needed to get some footage of Tom lip syncing in
front of a green screen to add in.

After adding in some green screen footage into the edit I found myself
with a lot of time left of the song and very little footage left to add
in. Therefore we went out to film some more footage. We decided that it
would be good to get some clips of the older version of Tom to walk in
the places that himself and the girl used to, looking sad to show that
he is thinking back to when he was there as his younger self.

Here you can see myself adding in this footage to the edit and I have
plenty of footage left to fill this up. The clips from the older tom go
really well edited against the younger tom character. Where he used to
walk with summer and revisiting this location.

I decided that I would like to add a sort of intro to my music video. I
chose a clip of tom looking like he is thinking to signify that he is
thinking about when he was with summer, with the next clip being the
start of the story this links well. I also added in the song name,
artist and album name at this point to make it look more professional.

For the green screen I needed to add on the garbage matte which allows
me to make the green screen area around tom smaller to reduce the chance
of seeing it and also the ultra key which allows me to the pick out the
colour which will be removed, for example green for the green screen.

Now that I have done this I can move Tom around on the screen, in front
of some footage behind. From the start we knew that we wanted the
memories in the background therefore we stuck to this and placed the
picnic scene behind him lip syncing.

The clips that were playing behind Tom are memories as mentioned before
therefore I have made these clips black and white to signify this. Here
is me playing with the black and white colour control.

Now that I have added this green screen background footage I am finally
done with the editing. Here is the timeline for my finished music video
edit.

Wednesday, 27 January 2016
Planning: Filming Schedule
When I made my filming schedule I had to consider a lot of different factors. I needed to make sure that the star of my music video is available on these dates before setting the dates.
I have decided to have two days at the corn fields recording both times the characters meet and then one day selected to work on the parts with older Tom starring in it, this gives me plenty of time to get all of my shots along with several takes of each shot to make sure we have enough footage to edit with.


My filming schedule is not set in stone, if there is a sudden change of the cast's availability then dates will need to be changed. We may also decide to add in some equipment or props for example along the way which are not mentioned here.
Planning: Shot List
I have created an animatic which I will attempt to follow closely when I start my production however I feel that it would be more efficient to also have a shot list along side it which I can follow and this includes all of the scenes that will appear in the music video. I will also hand out a copy of the shot list to the star of the music video so they can see what they are going to need to do when it comes to the filming. After this I intend to create a filming schedule and decide the order in which I will shoot my music video.


Although I have made this shot list it does not mean I have to stick to it exactly. If, along the line of production, I think that a shot does not work or a shot needs to be altered, removed or added for example I will do so. This shot list is not final it is just here for guidance.
Planning: Casting
The person that I cast will also need to appeal to my target audience to really engage them and draw them into the music and really connect to the music video, therefore I will need to cast someone who is like my target audience so the link is there. I will need to make sure that their schedule would have available times that fit into my filming schedule. I took some pictures of potential candidates that I could potentially cast in the music video and I have explained their good and bad features and at the end explained who I have picked and why.
Casting is a very important part of the planning stage as the person that I choose to star in my music video will need to be the best I can find. The person that I would like to act in my music video needs to be male, and they must be able to feel comfortable performing in my music video as that is what will make it good.
The star that I will cast needs to be very confident because if they are self conscious when in front of a camera then it will make the music video very awkward. The audience may feel disconnected and awkward whilst watching the music video if the star is self conscious. The person that I cast as the star for my music video will need to be good at lip syncing as this is a major part of the music video; they will need to be able to convince the audience that they are actually singing. To make it look believable the person I cast will need to be confident whilst doing it.

I have decided to use pictures from their Facebook profile as I believe it shows you more about them and their personality. This is Tom Kelly and as you can see he is a very confident and outgoing person. He can be comedic and therefore in front of the camera he could bring a funny side to the music video however he can be serious when needed therefore he would be a great choice for the star of the music video. Tom has told me that he would like to be part of the music video and his schedule is relatively free therefore we could fit in filming times.

This is Rhys Kowalczuk. Rhys is a very outgoing person and loves media and the photography side of it, as you can see in his picture. Rhys is lacking confidence and can be very camera shy therefore I don't know if he would be able to keep a straight face whilst filming the music video. His schedule is very open however and filming would not be a problem if I was to choose Rhys as the star of the music video.

This is Jake Liggins. Jake is a outgoing person as well and is completes everything at his best, therefore if I was to pick him to star in my music video he would make sure everything is the best he could possibly make it which is good. Jake however is a very busy man therefore his schedule is almost full and finding time to film would be difficult. Jake is very confident in front of the camera and would connect well with the target audience if he was picked.
After looking at my potential three candidates to star in my music video I have decided that Tom was the most suitable to perform in it. I am close friends with Tom and I know him very well therefore I know he would be a very good pick to star in the music video as he is confident and ready to do his best.
I have not done any initial lip syncing tests with Tom but if he struggles to do it effectively then I will make sure to take several takes of each part of the music video and when it comes to the editing I will pick the best ones.
Monday, 25 January 2016
Planning: Camera Equipment & Lighting
In our music video there are going to be a few scenes in the video which will require a slow motion feature to be on the camera. An example of this within the music video will be where the 2 younger actors walk off into the sunset. This will be in slow motion and will then dim into darkness.
Below you are able to see the camera that we will be using to film the music video.

 After reading the information within the camera description we then realised that this would be the camera that will be used. This is becasue there is a part that I have screenshot above and it says that you are able to film in Super Slo-Motion.
When we got the camera we explored some of the slow motion features within the camera and how well the quality would be when filming what is needed. One problem that we did find when testing the camera was the lighting as the lighting was very dim throughout the whole of our test filming. We will now have to take great care when choosing the location of our filming, but there are ways around bad lighting such as a light box that can be used to light up a face if the face is staying in the same spot. The light box can be seen below.
 Above you are able to see the light box and the amount of light that it is actually giving off. On the back of the light where you are able to change the intensity of the light.
The lighting of our music video is a vital and important component of any production as it enables you to see everything that is going on instead of having unwanted shadows. I will also be able to film under great lighting facilities. This is because the lighting in the theatre is good and this is where the music video will be filmed mostly.
Below you are able to see the camera that we will be using to film the music video.

When we got the camera we explored some of the slow motion features within the camera and how well the quality would be when filming what is needed. One problem that we did find when testing the camera was the lighting as the lighting was very dim throughout the whole of our test filming. We will now have to take great care when choosing the location of our filming, but there are ways around bad lighting such as a light box that can be used to light up a face if the face is staying in the same spot. The light box can be seen below.

The lighting of our music video is a vital and important component of any production as it enables you to see everything that is going on instead of having unwanted shadows. I will also be able to film under great lighting facilities. This is because the lighting in the theatre is good and this is where the music video will be filmed mostly.
Monday, 4 January 2016
Planning: Props
Prop 1:
 This is prop one that we will need whilst in the music video. This is because within the music video there is a scene in which the two children in the music video are having a picnic and this will be needed so that they have somethin to sit on.
Prop 2:

 This is the third prop that we will be using is a microphone as this will be used when the actor is lip syncing to the song in front of the green screen. This will be easy to get hold of as we should have a lot of different microphones and stands at school which we should be able to borrow if needs be.
Prop 2:

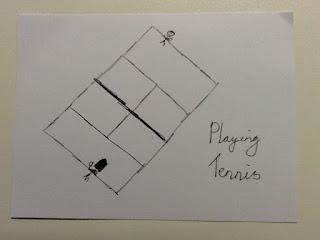
This is the second prop that we will need in the music video. This is because this is the second activity that the two children do within their little date whilst in the music video. We chose tennis as it is easy to do and its cheap to buy rackets and tennis balls for.
Prop 3:

Planning: Costume
Option 1:
 |
| So this is option one for the top and this will be worn with a pair of jeans and a pair of black shoes. Which can be seen below. |
 |
 | |
| The shoes that have been chosen will fit the rest of the costume. It would also fit the type of music that this video is made for. |
Option 2:


Above you can see the second option that we will be giving to the actor to have a choice. With the top that you can see on the left you could also have that top in different colours but it will be the choice of the actor to choose the colour of the top. These are both very cheap things to buy and will only cost the max of £10 for both things if we can get some deals on them. With this outfit i will have an option between the shoes in costume 1 and a pair of trainers which we believe will match the rest of the costume better than black shoes.
Added extras to the costume:
In some elements of the video depending on weather we may need sunglasses as it will show the name of the song and it would fit well. This is all weather depending as it wouldnt look good if you were wearing sunglasses in the rain.
Overall, we think we will choose option 2 as it will look a lot better with the actor who is going to be wearing it and we have chosen the white shirt instead of any other colours that were available. This will then influence the effect on the artists target audience.
Friday, 4 December 2015
Planning: Filming Location
The locations of where we will film our music video will be extremely important to what the music video will end up looking like. We have had to consider a lot of different factors when choosing our music video locations. One thing that we have to be aware of is the availability of the location and this may be a problem with a couple of the locations that we are planning to film in. Another thing that we will have to watch out for would be the general location on where it is and how far we will have to travel to get there.
Location 1 - Theater


Location 1 - Theater
I intend to film most of the music video in the theatre as most of the music video will be the performer in front of a green screen. This will mean that the green screen will be needed for this part of the music video. The point of filming in this location is so we are able to have a spacious and quite location so we are able to film the lip syncing parts of the music video.There is one possible problem with the location and that is the availability of the location. We decided that this would be a good location because of the high ceilings as well as how much space there actually is. Events often take place in this location so we will have to make sure that we book the area well in advance of when we need to film in there.


Location 2 - Corn Fields
During the music video there will be a scene in the music video in which there are 2 children who are posing as the current day artist and his girlfriend in the past are meeting and running through the fields. We have chose this location because once again it is a good open space in which a lot of filming can be done in the one location. The 2 children in the corn fields are a boy and a girl who are boyfriend and girlfriend. The boy is the past version of the artist who will feature in the video. The one problem with this location is that we are unable to change any of the lighting as it is an outdoor area. So on the day we are hoping for good weather and good lighting. If it is bad weather or lighting it means we will have to go and either film on a different day or increase the lighting on the video whilst editing it.


Friday, 27 November 2015
Planning: Storyboard & Animatic
Now that myself and Ryan have thought of the idea for our music video we began to put together the storyboard animatic. Firstly, we needed to do the story board part which is easy as we need to put our thoughts onto paper in drawings. We got several paper cards and drew on them with the shots we wanted for our music video. We then made a timeline in which we placed the panels along to clearly show in which order we want the shots.
Making the animatic requires good artistic skills to clearly represent what we want the shots to look like, however the drawings were not very good but they still got the idea across to the viewer. Whilst editing the animatic I needed to make sure that if the were cuts to the beat at points in the song then I had put them in. Throughout the production of my animatic I put in a lot of cuts to the beat.


Making the animatic requires good artistic skills to clearly represent what we want the shots to look like, however the drawings were not very good but they still got the idea across to the viewer. Whilst editing the animatic I needed to make sure that if the were cuts to the beat at points in the song then I had put them in. Throughout the production of my animatic I put in a lot of cuts to the beat.


Here are all of the panels that were used for the animatic. We used some of the panels several times to give a feeling of memories etc. These are not in the order used in the animatic.


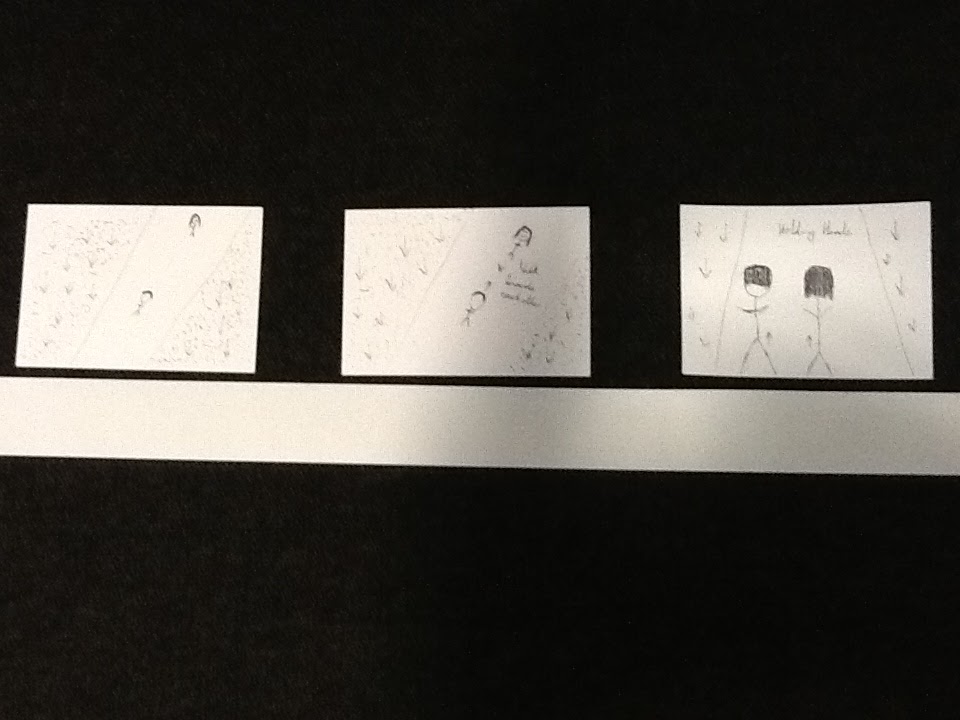

Here is the timeline with the panels placed across it, this is our first thoughts and therefore the finished animatic will have developed and changed to make it better, changes that we needed to make were found in the editing process.
Here is the completed animatic of the song 'Summer'.
The process of completing the animatic instead of just taking some photos of a storyboard was extremely important because it helps us to visualise what the music video is going to look like and now we just need to replace the drawings with actual shots. Making this animatic also gave me the chance to practice with Premiere Pro beforehand. Practicing cutting to the beat and other effects for this animatic is very helpful as these effects will be used for the final product.
Now the animatic is completed I will move onto the other parts of pre-production. I will now do my location planning and casting etc. for my final product.
Subscribe to:
Posts (Atom)